 Automation Add Ins As Functions Libraries For Excel And VBA
This page describes creating an Automation Add In Function Library In Visual Basic 6.

Automation Add Ins, introduced in Excel XP (2002), are similar to, but simpler than, COM Add Ins (see
Creating A COM Add In for information about creating a COM Add In).
The purpose of an Automation Add In is to provide a library of functions that can be called directly from worksheet cells
in workbooks that reference the Add In. For the rest of this article, we will use the term "Add In" to mean an "Automation Add In"
unless specified otherwise.
For details about writing an Automation Add-In using Visual Basic NET (or any NET language), see
Creating A Function Library In VB.NET.
An Automation Add In provides several advantages over a standard XLA Add In.
- Execution Speed -- An Automation Add In written in VB6 is compiled to native machine code which runs much faster than the interpreted VBA languange.
- Security -- Unlike an XLA add in, you never distribute the source code to the end users. If your code has proprietary information or
intellectual property value, that remains safely protected on your own computer. It is never distributed to the user. Your code can never be compromised.

All COM Add-Ins are also Automation Add Ins, but not all Automation Add Ins are COM Add Ins. The difference, in summary, is that
a COM Add In must implement the IDTExtensibility2 interface, which provides the "bridge" between the
COM Add In and Excel. This interface, defined in the "Microsoft Add In Designer" library (MSADDNDR.dll),
is implemented either directly through an Implements AddInDesignerObjects.IDTExtensibility2 statement
or indirectly via an add in designer object. Additionally, the COM Add In must be registered in either the system registry
hive HKEY_LOCAL_MACHINE\Software\Microsoft\Office\Excel or the hive
HKEY_CURRENT_USER\Software\Microsoft\Office\Excel. An Automation Add In does not need to implement the
IDTExtensibility2 interface (although it can do so with no ill effects) and needs to be registered
only in the hive HKEY_CLASSES_ROOT. The creation of the required registry information is carried
out automatically on the local machine when the VB6 project is compiled, or can be carried out by running
the RegSvr32 program on either the local machine or another machine on which the Add In will be
used.(See Distributing Your Automation Add In at the end of this page.)
Since a COM Add In is also an Automation Add In, you can call functions defined in classes of your COM Add In directly from worksheet
cells by using the steps described in the Using The Automation Add In In Excel section of this page.
While COM Add Ins almost always provide some sort of user interface elements by which you carry out
actions -- menu items, command bar buttons, and so on -- an Automation Add In generally provides no user interface.
It is simply a library of functions. If you think you need any user interface elements, you need a COM Add In,
not an Automation Add In. (See Creating A COM Add In for a description of how to create a
COM Add In.)
An Automation Add In may be either an in-process DLL or an out of process EXE program. COM Add Ins
are always in-process DLLs. This page looks at only in-process DLLs. The process of creating an out of process EXE is
nearly identical, with the exception that you create an ActiveX EXE project rather than an ActiveX DLL project in Visual Basic.
Create a directory named C:\SampleAutomationAddIn (or any folder name you desire) in which
to store the files. Open Visual Basic 6 and select ActiveX DLL from the New Project dialog. This will create an
ActiveX DLL project with a project file named Project1 and one class module named
Class1. Change the name of the project to MathForExcel and change
the name of Class1 to Root. In its most simple form, this is all we need for an
automation add in. However, we're going to enhance this design to create categories of functions via a simple object model within
MathForExcel.
Add two new class modules to the project and name them Trig and Sums. The
Trig class will contain functions related to trigonometry and the Sums
class will contain functions for summing numbers. This example Add In will contain only a handful of very simple functions.
In the real world, you would add additional and more complex functions to the classes.
Open the Trig class and paste in the following code:
Private Const PI As Double = 3.14159265358979
Function DegreesToRadians(Degrees As Double) As Double
'''''''''''''''''''''''''''''''''''''''''''''''''''
' DegreesToRadians
' Converts Degrees To Radians
'''''''''''''''''''''''''''''''''''''''''''''''''''
DegreesToRadians = (PI * Degrees) / 180
End Function
Function RadiansToDegrees(Radians As Double) As Double
'''''''''''''''''''''''''''''''''''''''''''''''''''
' RadiansToDegrees
' Converts Radians To Degress
'''''''''''''''''''''''''''''''''''''''''''''''''''
RadiansToDegrees = (Radians * 180) / PI
End Function
These are simple functions that convert angular measurements between Radians and Degress. In a real world add in,
you would have many additional trigonometry-related functions.
Open the Sums class module and insert the following code:
Function SumAToB(A As Long, B As Long) As Long
'''''''''''''''''''''''''''''''''''''''''''''''''''
' SumAToB
' Sums the integers from A to B.
'''''''''''''''''''''''''''''''''''''''''''''''''''
SumAToB = 0.5 * ((B * (B + 1)) - (A * (A - 1)))
End Function
This function simply return the sum of the numbers for A to B. Again, in the real world you would have many other more
complex functions in the Sums class.
Close the Trig and Sums class modules and open the
Root class. In that module, paste the following code:
Private pSums As MathForExcel.Sums
Private pTrig As MathForExcel.Trig
Private Sub Class_Initialize()
Set pSums = New MathForExcel.Sums
Set pTrig = New MathForExcel.Trig
End Sub
Public Property Get Sums() As MathForExcel.Sums
Set Sums = pSums
End Property
Public Property Get Trig() As MathForExcel.Trig
Set Trig = pTrig
End Property
This code sets up a little object model with the MathForExcel DLL. We first declare two private variables
pTrig and pSums that will hold references to instances of the
Sums and Trig classes. When the class is initialized, the
Class_Initialize procedure runs and sets pSums and pTrig
variables to New instances of the Sums and Trig classes.
Next, we have two public properties, Sums and Trig. These properties return references to
the pSums and pTrig objects, which are in turn instances of the classes
Sums and Trig. Because you access the Sums and
Trig objects and their functions via the properties of the Root class, it is safe to
say that in this context the Sums and Trig classes are subordinate or child
classes of the Root class.
As you may have noticed, no where so far have we made any reference in the automation add in project or code to Excel. If you
want to use Excel objects in your code, such things as Ranges, Worksheets, and so on, you'll need to add a reference in your VB6 project
to the Excel type library. Go to the Project menu, choose References and click Browse and enter the following
in the file name box:
C:\Program Files\Office2003\OFFICE11\EXCEL.EXE
Of course, your path to the Excel.exe file may differ. This reference is not required for a generic Automation
Add In. It is required only if you are using Excel-defined objects in the code. You may also
want to set a reference to the Office type library. This is typically the file
C:\Program Files\Common Files\microsoft shared\OFFICE11\MSO.dll
As before, your actual path to the MSO.dll may be different than
the path shown above.
In this example Add In, we put the callable functions in two separate classes, based on their functionality. This is not necessary. It is
perfectly acceptable to put all your functions in the Root class and dispense with the other classes.
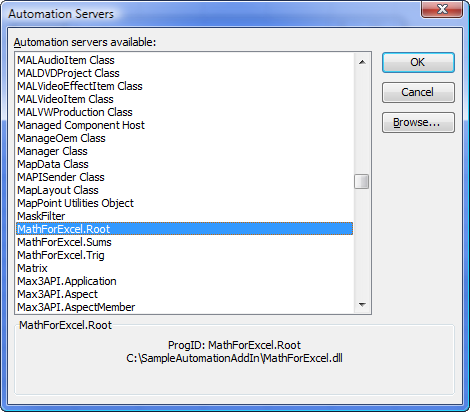
If you take route, you would select only MathForExcel.Root in the Automation Servers dialog box.
You are now ready to save and compile the project. First, choose Save Project from the File menu and ensure that all files
are saved to the folder C:\SampleAutomationAddIn folder. Then, from the File menu, choose
Make MathForExcel.dll, ensure the DLL is going to the same folder, and click OK.
When you compile the DLL, an entry in the HKEY_CLASSES_ROOT registry region will be added for this automation class
along with some identifying information.
When Excel loads the Automation Add-In, it does not pass to it a reference to the
Excel Application object. Indeed,
there is no way to determine where and how the ActiveX DLL is loaded. This means that you
will not have a reference to the Application Object. This prevents you from using code like
Function AppVersion() As String
    AppVersion = Application.Version
End Function
This won't work because there is no Application object that refers
back to Excel. To get a reference to the application, you need to first set a reference
in your project to the Microsoft Add-In Designer, typically located at
C:\Program Files\Common Files\Designer\MSADDNDR.dll. With the
reference in place, put the following code at the top of each of your automation classes
(the Trig and Sums classes in the
example presented above):
Implements IDTExtensibility2
Then, in a regular code module, create a Public variable of type
Excel.Application.
Public XLApp As Excel.Application
Then, back in the automation classes (Trig and
Sums in the example), provided methods for the
IDTExtensibility2 interface. Of the five methods defined
in the interface, we will use only two, IDTExtensibility2_OnConnection
and IDTExtensibility2_OnDisconnection:
Private Sub IDTExtensibility2_OnConnection( _
        ByVal Application As Object, _
        ByVal ConnectMode As AddInDesignerObjects.ext_ConnectMode, _
        ByVal AddInInst As Object, custom() As Variant)

    Set XLApp = Application
End Sub

Private Sub IDTExtensibility2_OnDisconnection( _
        ByVal RemoveMode As AddInDesignerObjects.ext_DisconnectMode, _
        custom() As Variant)
    Set XLApp = Nothing
End Sub
However, when implementing an interface, you must provide for all the methods defined
in the interface. Therefore, add the following code to the automation classes.
Private Sub IDTExtensibility2_OnAddInsUpdate(custom() As Variant)
End Sub
Private Sub IDTExtensibility2_OnBeginShutdown(custom() As Variant)
End Sub
Private Sub IDTExtensibility2_OnStartupComplete(custom() As Variant)
End Sub
These last three methods are not used but must be present in the classes that implement
IDTExtensibility2. Include a comment line within the body
of each method so that the compiler will not strip out what it sees as an unused method.
Now, your XLApp variable will be initialized to the Excel application
when the add-in is loaded.
This bit of machination is required only if you need to reference the Application without
going through another object. For example, if you pass a Range object, you can get to the
Application object through the Range. A modification of the AppVersion
function shown above illustrate how to get to the Application from a Range.
    Function AppVersion(R As Range) As String
        AppVersion = R.Application.Version
    End Function
 Once you've written and compiled the Automation Add In, you are ready to use it within Excel. Open Excel (version XP-2002 or later), go to the
Tools menu and click Add Ins. In that dialog, click the Automation button to display the complete list of available
automation servers. In the list, find MathForExcel.Sums, select it, and then click OK. Do the same for
MathForExcel.Trig. These two automation add ins will appear in the Excel Add-Ins.
Once you've written and compiled the Automation Add In, you are ready to use it within Excel. Open Excel (version XP-2002 or later), go to the
Tools menu and click Add Ins. In that dialog, click the Automation button to display the complete list of available
automation servers. In the list, find MathForExcel.Sums, select it, and then click OK. Do the same for
MathForExcel.Trig. These two automation add ins will appear in the Excel Add-Ins.
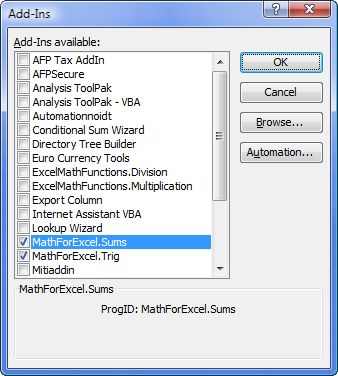
Note that since there are no callable functions in the Root class, it is not necessary
to add the MathForExcel.Root automation server.
With these references in place, you can call the functions in the Automation Library as if they were native Excel functions. For
example,
=SumAToB(1,10)
=DegreesToRadians(90)
If there is the possiblity of a name collision (two functions with the same name in different libraries) you can specify the name
of the library in the function call to direct Excel to the proper function:
=MathForExcel.Trig.DegreesToRadians(90)
In addition to using the functions in your Automation Add In in worksheet cells, you can also call those functions from within your VBA code.
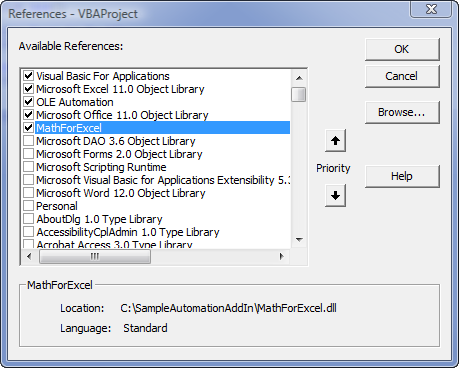
The first step is to establish a reference to your automation add in. In the VBA Editor, with your VBProject active, to go the Tools
menu and choose References. In that list, scroll down to MathForExcel and check the box next to it.
Then, you need to declare an object variable of type MathForExcel.Root, and set that variable to a New instance of the
Root class. Then you can call function in the automation add in by going through that MathForExcel.Root variable. For example,
Public MathXL As MathForExcel.Root
Sub AAA()
Dim Degs As Double
Dim Rads As Double
If MathXL Is Nothing Then
Set MathXL = New MathForExcel.Root
End If
Rads = MathXL.Trig.DegreesToRadians(90)
Debug.Print Rads
End Sub
You will most likely need to distribute your Automation Add In to other users on other machines. To do this, copy the
MathForExcel.dll file to the other machine, save it in some folder (the actual folder doesn't really
matter), and then run the RegSvr32 program to register the DLL on the new machine. From the Windows Start
menu, choose Run and type:
RegSvr32 "C:\YourFolder\MathForExcel.dll"
where C:\YourFolder is the name of the folder on the new machine in which you saved the
MathForExcel.dll file name. Now that the DLL is registered, you can use it in Excel on the new machine.
Adding The COM Add-Ins Menu Item
Automation Add-Ins
Distribution And Security Issues Of COM Add-Ins
COM Add-Ins In Excel 2007
COM Add-Ins, Getting The DLL Name Of
COM Add-Ins, Installer (download zip file)
This page last updated: 17-August-2007