This page describes the various debugging resources available in the VBA Editor (VBE) and how to use them. These are basic descriptions of the various diagnostic tools and how to use them. See the on-line help for more details.
Immediate Window
The Immediate Window is a window in the VBE in which you can enter commands and view and change the contents of variables while you code is in Break mode or when no macro code is executing. (Break mode is the state of VBA when code execution is paused at a break point (see Breakpoints, below). To display the Immediate Window, press CTRL+G or choose it from the View menu.
In the Immediate Window, you can display the value of a variable by using the ? command. Simply type ? followed by the variable name and press Enter. VBA will display the contents of the variable in the Immediate Window. For example,
?ActiveCell.Address
$A$10
You can also execute VBA commands in the Immediate
Window by omitting the question mark and entering the command followed by
the Enter key:
Application.EnableEvents=True
or
Range("A1").Value = 1234
The Immediate Window won't let you enter VBA code
snippets and execute them together because the Immediate Windows executes
what you enter when you press the Enter key. However, you can combine
several "logical" lines of code in to a single "physical" line of code using
the ':'
character, and execute this entire command. For example, to display
each element of the array variable
Arr use
the following in the Immediate Window.
For N= LBound(Arr) To
UBound(Arr): Debug.Print Arr(N) : Next N
The Immediate Window always acts as if there were no Option Explicit statement in the active code module; that is, you don't have to declare variables you might use in Immediate Window commands. In fact, this is prohibited and you'll receive an error message if you attempt to use Dim in the Immediate Window.
Debug.Print
You can use the
Debug.Print
statement anywhere in your code to display messages or variable values in
the Immediate Window. These statements don't require any confirmation
or acknowledgement from the user so they won't affect the operation of your
code. For example, you can send a message to the Immediate Window when
a particular section of code is executed.
'
' some code
'
Debug.Print "Starting Code Section 1"
The liberal use of
Debug.Print statements makes it easy to track the
execution of your code.
Debug.Print statements have no effect on the
execution of your code and so it is safe to leave them in code projects that
are distributed to end users.
Debug.Print statements send messages to the
Immediate Window, so you should have this window open in order to see the
messages.
Unfortunately, there is no way to programmatically clear the Immediate Window. This is a shortcoming that has frustrated many programmers.
Debug.Assert
In Excel 2000 and later, you can use
Debug.Assert
statements to cause the code to break if a condition is
not met. The syntax for
Debug.Assert
is:
Debug.Assert (condition)
where condition is some VBA code or expression that returns True (any numeric non-zero value) or False (a zero value). If condition evaluates to False or 0, VBA breaks on that line (see Breakpoints, below). For example, the following code will break on the Debug.Assert line because the condition ( X < 100) is false.
Dim X As Long
X = 123
Debug.Assert (X < 100)
Debug.Assert is a useful way to pause code execution when special or unexpected conditions occur. It may seem backwards that Debug.Assert breaks execution when condition is False rather than True, but this peculiarity traces its roots back to early C-language compilers.
Remember, your end users don't want the code to enter break mode under any circumstances, so be sure to remove the statements before distributing your code, or use Conditional Compilation (see below) to create "release" and "debug" versions of your project. Note that Debug.Assert is not available in Excel97 or earlier versions.
Break Points
A break point is a setting on a line of code that
tells VBA to pause execution immediately before that line of code is
executed. Code execution is placed in what is called break mode. When VBA is
in break mode, you can enter commands in to the Immediate Window to display
or change the values of variables.
To put a break point on a line of code, place the cursor on that line and
press F9 or choose "Toggle Breakpoint" from the Debug menu. To remove a
break point, place the cursor on the line with the break point and press F9
or choose "Toggle Breakpoint" from the Debug menu. When a line
contains a break point, it is displayed with a brick colored background.
Immediately before this line of code is executed, it will appear with a
yellow background. Remember, when a break point is encountered, code
execution is paused but that line of code has not yet executed. You cannot
place break points on blank lines, comment lines, or variable declaration
lines (lines with Dim
statements).
After a break point is encountered, you can resume normal code execution by pressing F5 or choosing "Continue" from the Run menu, or stepping through the code line by line (see below). Note that break points are not saved in the workbook file. If you close the file, all break points are removed. Breakpoints are preserved as long as the file is open.
Stepping Through Code
Normally, your code runs unattended. It executes until its logical end. However, when you are testing code, it is often useful to step through the code line by line, watching each line of code take effect. This makes it easy to determine exactly what line is causing incorrect behavior. You can step through code line by line by pressing the F8 key to start the procedure in which the cursor is, or when VBA is paused at a break point. Pressing F8 causes VBA to execute each line one at a time, highlighting the next line of code in yellow. Note, the highlighted line is the line of code that will execute when you press F8. It has not yet been executed.
If your procedure calls another procedure, pressing F8 will cause VBA to step inside that procedure and execute it line by line. You can use SHIFT+F8 to "Step Over" the procedure call. This means that the entire called procedure is executed as one line of code. This can make debugging simpler if you are confident that the problem does not lie within a called procedure.
When you are in a called procedure, you can use CTRL+SHIFT+F8 to "Step Out" of the current procedure. This causes VBA to execute until the end of the procedure is reached (an End Sub or Exit Sub statement) and then stop at the line of code immediately following the line which called the procedure.
Run To Cursor
VBA also supports "Run To Cursor". This is exactly what it sounds like. It tells VBA to execute code until the line on which the cursor is sitting is reached. When this line is reach, VBA enters break mode. This is similar to putting a break point on a line of code, except that the break point is temporary. The second time that line of code is executed, code execution does not pause.
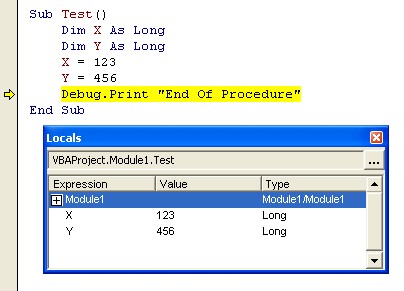
Locals Window
The Locals Window displays all the variables in a procedure (as well as global variables declared at the project or module level) and their values. This makes it easy to see exactly what the value of each variable is, and where it changes, as you step through the code. You can display the Locals Window by choosing it from the View menu. The Locals Window does not allow you to change the values of variables. It simply displays their names and values. The Locals Window is shown below. Note that the variables X and Y in procedure Test are displayed in the window. The line highlighted in yellow is the current line of execution -- it is the next line of code that VBA will execute.
Watch Window
The Watch Window allows you to "watch" a specific variable or expression and cause code execution to pause and enter break mode when the value of that variable or expression is True (non-zero) or whenever that variable is changed. (Note, this is not to be confused with the Watch object and the Watches collection).
To display the Watch Window, choose it from the View menu. To create a new watch, choose Add Watch from the Debug menu. This will display the Add Watch window, shown below.
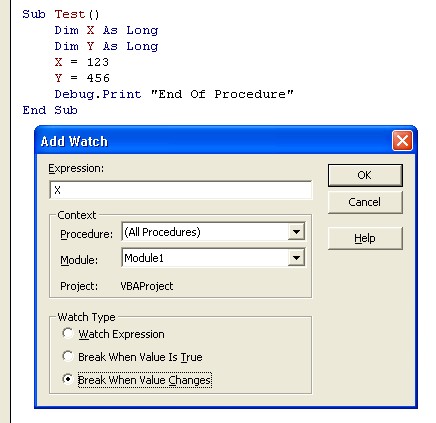
There are three types of watches, shown in the Watch Type group box. "Watch Expression" causes that watch to work much like the Locals Window display. It simply displays the value of a variable or expression as the code is executed. "Break When Value Is True" causes VBA to enter break mode when the watch variable or expression is True (not equal to zero). "Break When Value Changes" causes VBA to enter break mode when the value of the variable or expression changes value.
You can have many watches active in your project, and all watches are displayed in the Watch Window. This makes is simple to determine when a variable changes value.
Conditional Compilation
While not directly part of debugging code, conditional compilation allows you to create "debug" and "release" versions of your code. For example, you may want to include message boxes, or Debug.Print or Debug.Assert statements while you are developing and testing your code, but you don't want those to be active when you release the code to users. VBA allows you to include or exclude blocks of code with a technique called conditional compilation. Conditional compilation uses If, Then, and Else statements to include or exclude a block of code. First, you want to create a compiler variable called, for example, DEBUG_ . Use the #CONST directive to create the variable.
#CONST DEBUG_ = True
Then, delimit blocks using the compiler directives to include various blocks of code. For example,
#If DEBUG_ Then
Debug.Assert (X<100)
#End If
Note the use of the # character. In your development version, keep the value of DEBUG_ equal to True. When you are ready to release the code to end users, set this one constant value to False to prevent the Debug.Assert statement from even being included in the compiled code.