Beginning in Office 2000, Office programs such as Excel or PowerPoint began support for a new type of add-in called a COM Add-In (or CAI). A CAI is completely different from and independent of standard application add-ins such as an XLA addin. There are several advantages to using a COM Add-In rather than an application add-in such as an XLA file.
Peformace:
A COM Add-In is a special type of DLL file and is compiled to native machine code,
rather than the much slower interpreted code like an XLA written in VBA.
Security:
Since a CAI is a compiled DLL file, you distribute only the DLL file to the
end users. Unlike an XLA add-in, no source code is distributed.
This allows you to write proprietary code without worrying about end users
or competitors gaining access to your code. The password protection of an XLA project is
notoriously weak and with the right tool (such as VBAKey, $40 from
Passware), a user can crack the VBA password in a matter of seconds. With
a CAI, no source code is ever distributed to the end user, so your code remains safely stored on your own machine -- it is never distributed to
the users.
Multiple Application Support:
Perhaps the biggest advantages of a CAI is the ability to interface
with more than one Office program. You can write one add-in, one
project, with one code base, and use
that add-in in Excel, Word, and PowerPoint or any other application that
supports COM Add-Ins. Of course, you have to write
code to support multiple applications, but you will still distribute only a
single file that will work in any supported Office application. This greatly
simplifies the development process because you have only one set of source
code files to manage, promotes code reuse since the same functions can be
used by all the application's code objects, and makes installation on the
end user's machine simpler since there is only a single file to distribute.
Use Of Additional Components:
You can write a CAI in any language you like as long as that language is
capable of supporting COM. This includes Visual Basic and Visual C++. This
article will deal only with VB6. (Add-ins, VB.NET, and the Visual
Studio Tools For Office (VSTO) will be described on an upcoming web page.) Since your CAI is written in VB6,
your forms will be VB6 Forms, not VBA UserForms. This means you have the
enhanced functionality of VB6 Forms such as command bars and menu bars and a
Status Bar on the forms. All of these are unavailable in VBA UserForms
Working in the VB6 environment, you will have access to all controls
supported by VB6, including many that are not supported in VBA UserForms.
Callable Functions In A COM Add-In
With 2002 (XP), Excel introduced Automation Add-Ins. An automation add-in is a
CAI that exposes one or more public functions in a public class module.
If you load an Automation Add-In, you can call the public functions in the
CAI directly from worksheet cells. This gives you the ease of use of VB
and speed nearly comparable to an XLL add-in (which have their own
drawbacks).
This page will take you step-by-step through the creation of a COM Add-In that supports Excel and PowerPoint 2003. It is assumed that you are familiar with VB6, using event procedures, and creating menu items and command bars with code.
Starting A New COM Add-In Project In VB6
The first thing to do to is create the basic framework for the COM Add-In. In this section, we will not use the Add-In project template because not all versions of Office and VB provide that template and its objects. Instead, we'll take a slightly longer method using the IDTExtensibility2 interface. Using the IDTExtensibility2 Interface rather than the project template also allows us to write a single connection class that handles all supported applications. This simplifies the installation of the CAI on the end user's machine.
Before you write your first line of code, you need to create the environment for development of the CAI. In VB6, go to the File Menu and choose "New Project" and choose "ActiveX DLL". Remove the Class module that VB creates for you -- we won't be using this. We'll add our own class modules later. In the Properties window, change the name of the project from "Project1" to something meaningful. In this example, we will use "ExampleCAIProject" for the Project name.
From the Project menu, choose References, and add the following references to the existing reference list.
- Microsoft Add-In Designer ( C:\Program Files\Common Files\DESIGNER\MSADDNDR.DLL)
- Microsoft Office Object Library (C:\Program Files\Common Files\Microsoft Shared\OFFICE11\MSO.DLL)
- Microsoft PowerPoint Object Library (C:\Program Files\Office 2003\OFFICE11\msppt.olb)
- Microsoft Excel Object Library (C:\Program Files\Microsoft Office\Office11\Excel.exe)
Of course, your actual path names may be different than those above.
This sets up the references to the type libraries for the common Office objects such as CommandBars and for application-specific objects. In the example project, we have references set to the Office, Excel, and PowerPoint object libraries in addition to the standard references used by VB itself.
You can download the complete VB6 Project, including the Installer workbook, here.
Creating The Connection Class
In this example, we will use a single class module to provide the connectivity to all the host applications, such as Excel and PowerPoint. Using a single connection class requires slightly more complicated code, but makes the installation and management of the CAI simpler. All supported applications use the same connection class.
Insert a class module to your project, name it ExampleConnect, and include the following code after the Option Explicit declaration.
Implements AddInDesignerObjects.IDTExtensibility2
The Instancing property of this class should be 5 - Multiuse.
When you implement an interface, you must include all the methods, properties, and events of that interface in your code even if you don't use those them. They must be included in the code. In the VB editor, change the dropdown box at the upper left of the code pane from "(General)" to "IDTExtensibility2". Then select each item in the dropdown box at the upper right of the code pane. Selecting an item in the dropdown list will add its procedure definition to the code pane. All methods must be included even if they are not to be used. There are five methods of IDTExtensibiliy2 that need to be defined. We will be using only two of these methods: IDTExtensibility2_OnConnection and IDTExtensibility2_OnDisconnection. For all the other methods, insert a comment indicating that the event is not being used and to prevent the compiler from stripping out empty procedures.
If your CAI is going to be responding to events in from the host application, you'll need to create class modules to handle these events. Create two new class modules and name them CExcelEvents and CPowerPointEvents. These classes should have their Instancing property set to 1 - Private. In the CExcelEvents module, use the following code:
    Option Explicit
    Option Compare Text

    Private WithEvents pExcelApp As Excel.Application

    Friend Property Get ExcelApp() As Excel.Application
        Set ExcelApp = pExcelApp
    End Property

    Friend Property Set ExcelApp(XLApp As Excel.Application)
        Set pExcelApp = XLApp
    End Property

    Private Sub Class_Terminate()
        Set pExcelApp = Nothing
    End Sub
In this module, define and code for any Excel application events that you want your CAI to handle. The event procedure code you will write in this module is identical to event procedure code that you would write in a VBA project. It is assumed you know how to write event procedures. Use similar code in CPowerPointEvents, making the obvious changes. If your CAI is not going to respond to application events, you may omit these modules.
Add a new module to the project named modProjectGlobals. We will store project-wide global variables and constants in this module. In this module, put the following code. If you are not using application Events in your CAI, you may omit the lines of code that refer to the event classes.
    Public ThisCAI As Office.COMAddIn
    Public ExcelApp As Excel.Application
    Public PowerPointApp As PowerPoint.Application
    Public ExcelEvents As CExcelEvents
    Public PowerPointEvents As CPowerPointEvents
    Public ExcelControls As CExcelControls
    Public PowerPointControls As CPowerPointControls
The ThisCAI variable will hold a reference to the CAI object itself, which is passed in as the AddInInst parameter of the OnConnection event. OnConnection is automatically called when the host application (e.g., Excel) loads the add-in. The ExcelApp and PowerPointApp variables are used to store the reference to the host application. We'll create all of the classes soon enough.
Now you are ready to add code to the OnConnection event procedure of the ExampleConnect class. In that class, write your OnConnection event as shown below. If you are not using application Events in your CAI, you may omit the lines of code that refer to the event classes.
    Private Sub IDTExtensibility2_OnConnection(ByVal Application As Object, _
            ByVal ConnectMode As AddInDesignerObjects.ext_ConnectMode, _
            ByVal AddInInst As Object, custom() As Variant)

    '''''''''''''''''''''''''''''''''''''''''''''''''
    ' Set ThisCAI to the instance of this COM Add-In.
    '''''''''''''''''''''''''''''''''''''''''''''''''
    Set ThisCAI = AddInInst

    '''''''''''''''''''''''''''''''''''''''''''''''''
    ' See if we're connecting to Excel. If so, set up
    ' the appropriate variables.
    '''''''''''''''''''''''''''''''''''''''''''''''''
    If TypeOf Application Is Excel.Application Then
        Set ExcelApp = Application
        Set ExcelEvents = New CExcelEvents
        Set ExcelEvents.ExcelApp = Application
    End If

    '''''''''''''''''''''''''''''''''''''''''''''''''
    ' See if we're connecting to PowerPoint. If so, set up
    ' the appropriate variables.
    '''''''''''''''''''''''''''''''''''''''''''''''''
    If TypeOf Application Is PowerPoint.Application Then
        Set PowerPointApp = Application
        Set PowerPointEvents = New CPowerPointEvents
        Set PowerPointEvents.PowerPointApp = Application
    End If

    End Sub
Creating Menu Items Or CommandBar Controls For Your COM Add-In
Unless your CAI is going to operate only in response to events raised by the host
application, you will need to create some sort of user interface (e.g., a
menu item or command bar button) to allow the user to access the functionality in your CAI. It is
assumed that you know how to create menu items in Office VBA. The procedure
is the same in VB6. While the code will be shown on this page, it will
not be explained in any detail.
For organizational purposes, you should put the code the declares, creates, and responds to menu items or commandbar controls in a separate class module, one class module for each host application you will be supporting. Create a class module called CExcelControls. The Instancing property of this class should be set to 1 - Private. In the modProjectGlobals module, declare a variable as the CExcelControls type:
Public ExcelControls As CExcelControls
Now, in your CExcelControls class, first declare a variable that will be set to the Excel Application and variables for the commandbar controls and/or menu items.
    Private pExcelApp As Excel.Application
    Private ExcelToolsMenu As Office.CommandBarPopup
    Private WithEvents MenuItem1 As Office.CommandBarButton

    Friend Property Get ExcelApp() As Excel.Application
        Set ExcelApp = pExcelApp
    End Property

    Friend Property Set ExcelApp(XLApp As Excel.Application)
        Set pExcelApp = XLApp
    End Property
To enable each control to have its own event handler code, rather than sharing a common event handler for all controls, we will not be using the Tag property of the CommandBarControl. Since the control has no tag value, we can't later use FindControls(Tag:=SomeTag) to get references to our controls for deletion. Therefore, to enable easy deletion of the controls when the CAI is disconnected from the host application, we will store a reference to each control we create in a Collection object. In CExcelControls, declare a Collection to store the control references. Use the Class_Initialize event to create a new Collection and the Class_Terminate event to destroy the Collection.
    Private ControlsCollection As Collection

    Private Sub Class_Initialize()
        Set ControlsCollection = New Collection
    End Sub

    Private Sub Class_Terminate()
        Set ControlsCollection = Nothing
    End Sub
Next you need to create functions that will
create and delete the controls. In CExcelControls, use Friend Sub CreateControls()
Set ExcelToolsMenu = pExcelApp.CommandBars.FindControl(Id:=C_EXCEL_TOOLS_MENU_ID)
Set MenuItem1 = ExcelToolsMenu.Controls.Add(Type:=msoControlButton, temporary:=True)
With MenuItem1
.Caption = "Click Me #1"
End With
ControlsCollection.Add Item:=MenuItem1
' Repeat the code above for each menu item or commandbar control you need to add.
' Be sure to add each control to the ControlsCollection object.
End Sub
Friend Sub DeleteControls()
Dim Ctrl As Office.CommandBarControl
For Each Ctrl In ControlsCollection
Ctrl.Delete
Next Ctrl
End Sub
where C_EXCEL_TOOLS_MENU_ID is a constant declared in modProjectGlobals with a value of 30007 (also create a constant named C_POWERPOINT_TOOLS_MENU_ID with the same value). In modProjectGlobals, declare the constants:
    Public Const C_EXCEL_TOOLS_MENU_ID As Long = 30007
    Public Const C_EXCEL_POWERPOINT_MENU_ID As Long = 30007
Finally, add the event handler code in the class CExcelControls for the control(s) created in CreateControls. The following is the procedure for the Click event of the menu item we added in CreateControls. Add the appropriate event procedures for all the controls you created.
    Private Sub MenuItem1_Click(ByVal Ctrl As Office.CommandBarButton, _
            CancelDefault As Boolean)
        MsgBox Ctrl.Caption
    End Sub
The CExcelControls class is now complete. For PowerPoint, you can use the identical code in a class name CPowerPointControls, just changing any reference from Excel to PowerPoint. Change the variable names appropriately. Of course, you do not need to have the same menu structure in PowerPoint as you do in Excel (or any other host application you are supporting). The CExcelControls class and the CPowerPointControls class are completely independent of one another, and because of the way the OnConnection code is structured (see below), either, but not both, CExcelControls or CPowerPointControls will be instantiated at any one time (per host application -- you can certainly have the CAI open simultaneously in both PowerPoint and Excel, and you don't have to worry about variables overwriting one another).
Now we have to add code in the OnConnection event of the ExampleConnect class to create an instance of CExcelControls and create the controls. Your OnConnection event in ExampleConnect should now look like the following:
    Private Sub IDTExtensibility2_OnConnection(ByVal Application As Object, _
            ByVal ConnectMode As AddInDesignerObjects.ext_ConnectMode, _
            ByVal AddInInst As Object, custom() As Variant)
    '''''''''''''''''''''''''''''''''''''''''''''''''
    ' Set ThisCAI to the instance of this COM Add-In.
    '''''''''''''''''''''''''''''''''''''''''''''''''
    Set ThisCAI = AddInInst

    '''''''''''''''''''''''''''''''''''''''''''''''''
    ' See if we're connecting to Excel. If so, set up
    ' the appropriate variables.
    '''''''''''''''''''''''''''''''''''''''''''''''''
    If TypeOf Application Is Excel.Application Then
        Set ExcelApp = Application
        Set ExcelEvents = New CExcelEvents
        Set ExcelEvents.ExcelApp = Application
        Set ExcelControls = New CExcelControls
        Set ExcelControls.ExcelApp = Application
        ExcelControls.CreateControls
    End If

    '''''''''''''''''''''''''''''''''''''''''''''''''
    ' See if we're connecting to PowerPoint. If so, set up
    ' the appropriate variables.
    '''''''''''''''''''''''''''''''''''''''''''''''''
    If TypeOf Application Is PowerPoint.Application Then
        Set PowerPointApp = Application
        Set PowerPointEvents = New CPowerPointEvents
        Set PowerPointEvents.PowerPointApp = Application
        Set PowerPointControls = New CPowerPointControls
        Set PowerPointControls.PowerPointApp = Application
        PowerPointControls.CreateControls
    End If

    End Sub
Finally, we need to delete our controls when the CAI is disconnected from its host application. Write your OnDisconnection event as shown below:
    Private Sub IDTExtensibility2_OnDisconnection(ByVal RemoveMode As AddInDesignerObjects.ext_DisconnectMode, _
        custom() As Variant)
    '''''''''''''''''''''''''''''''''''''''''''''''''''''''''''''''''''''''''
    ' IDTExtensibility2_OnDisconnection
    ' This executes when the COM Add-In is unloaded by the host application.
    '''''''''''''''''''''''''''''''''''''''''''''''''''''''''''''''''''''''''

    ''''''''''''''''''''''''''''''''
    ' Clean up Excel
    ''''''''''''''''''''''''''''''''
    If Not ExcelApp Is Nothing Then
        '''''''''''''''''''''''''''''''''
        ' Set ALL Excel object to Nothing.
        ' Otherwise they can cause the
        ' Excel process to continue to
        ' run in the background even
        ' after it appears to be closed.
        '''''''''''''''''''''''''''''''''
        Set ExcelEvents.ExcelApp = Nothing
        Set ExcelEvents = Nothing
        ExcelControls.DeleteControls
        Set ExcelControls = Nothing
        Set ExcelApp = Nothing
    End If

    ''''''''''''''''''''''''''''''''
    ' Clean up PowerPoint
    ''''''''''''''''''''''''''''''''
    If Not PowerPointApp Is Nothing Then
        '''''''''''''''''''''''''''''''''
        ' Set ALL PowerPoint object to Nothing.
        ' Otherwise they can cause the
        ' Excel process to continue to
        ' run in the background even
        ' after it appears to be closed.
        '''''''''''''''''''''''''''''''''
        Set PowerPointEvents.PowerPointApp = Nothing
        Set PowerPointEvents = Nothing
        PowerPointControls.DeleteControls
        Set PowerPointControls = Nothing
        Set PowerPointApp = Nothing
    End If

    Set ThisCAI = Nothing

    End Sub
Creating Callable Functions For Excel COM Add-Ins (Automation Add-Ins)
Excel 2002 (XP) and later supports Automation Add-Ins. An
Automation Add-In is simply a COM Add-In containing a Public Class module
containing functions that can be called directly from worksheet cells. To
take advantage of this, simply create a class module called ExcelFunctions
(or whatever you want). This Instancing property of this class should
be 5 - Multiuse. In that
class module, create the functions that you want to be able to call from Excel
worksheet cells. Be SURE to use appropriate and proper error handling. If an untrapped error occurs, the add-in will be unloaded and you'll have to
restart Excel and reload the automation add-in. For example, in the
class ExcelFunctions, you could have the simple function:
    Function DoubleIt(D As Double) As Double
    '''''''''''''''''''''''''''''''''''''''''''''
    ' DoubleIt
    ' This is an example function that simply
    ' doubles the input and returns the result.
    '''''''''''''''''''''''''''''''''''''''''''''
    DoubleIt = D * 2
    End Function
Then, in Excel, go to the Tools menu, choose Add-Ins (not COM Add-Ins), and click the Automation button. In the list that is displayed, find your VB6 project name followed by "ExcelFunctions" (or whatever class name you used) and click it. It will appear in the Add-Ins list. Once that is loaded, you can call functions in the ExcelFunctions class as if they were native Excel functions. In this example project, you would select ExampleCAIProject.ExampleConnect from the Automation Add-Ins list.
Then you can call DoubleIt with the the following formula:
=DOUBLEIT(1234)
Remember that a function, in VBA, an XLA add-in, or in an Automation Add-In, can not change any aspect of the Excel environment, including changing the value of a cell. Functions in Automation Add-Ins are no different than functions written in VBA. They can only return a value to the cell from which they are called.
Calling CAI Functions From VBA Code
To call the functions in your COM Add-In from other VBA procedure, rather than directly from the worksheet cell, see Calling Automation Add-In Functions In VBA on the Automation Add-Ins page.
Installing Your COM Add-In
Once you have created your CAI, you need to install it. Installation and startup and shutdown code requires modifying the System Registry. I have written a code module that works in both VBA and VB6 to handle the details of adding, modifying, and deleting registry keys and values. I strongly encourage you see the Functions For Working With The System Registry page, and that you download the modRegistry.bas module file and add it to your VB Project. We will be using the procedures in that file on this page to create, read, and write registry keys and values.
Automating The Installation With The
COM Add-In Installer Workbook
Because of the tedious work and potential for error when manually adding and editing the System
Registry keys and values, I have written an Excel workbook that will automate the
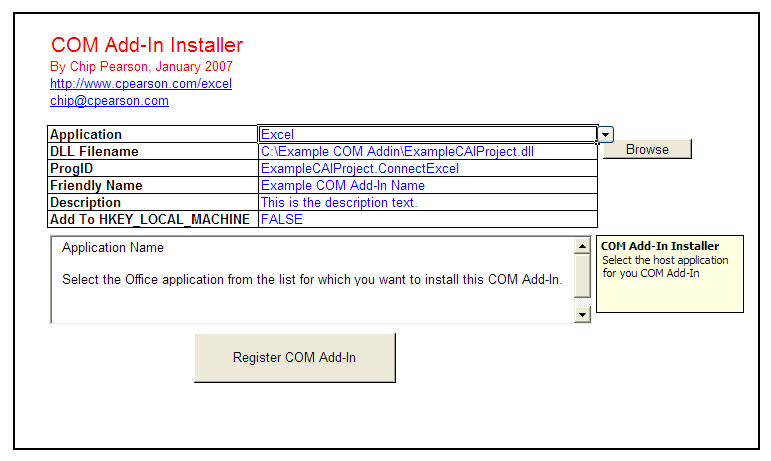
complete installation procedure of a COM Add-In. In the workbook,
you are presented with a screen like the one shown below. You simply fill
out the required fields an the installer does all the work for you. It will
register your DLL file with Windows and write the keys to the HKEY_CURRENT_USER section of the Registry, and optionally to the
HKEY_LOCAL_MACHINE section of the Registry (see below for caveats about
writing the keys to HKEY_LOCAL_MACHINE).
You can download the COM Add-In Installer here. The COM Add-In Installer requires the TypeLib Information DLL file, which is included in the zip file. If you already have this component installed on your machine, the workbook will function normally. If you do not have this component installed on your machine, you will receive compiler errors, "User-defined type not defined.". In this case, copy the file TLBINF32.DLL to your "C:\Windows\System32" folder, close Excel, go to the Windows Start menu, choose Run, and enter the following and click OK:
RegSvr32 "C:\Windows\System32\TBLINF32.DLL"
Then, open this workbook, go into VBA, go to the Tools menu, choose References, and scroll down to and check "TypeLib Information". Once this reference is established, the workbook should work fine. This library is used to retrieve the available ProgIDs of available objects in the DLL file. See the TLBINF32 Read Me.txt file in the downloadable zip project for more information about installing the TLBINF32.DLL file.
Registering The DLL With Windows
Before you can use your CAI in the host application, you need to register it
with Windows. You do this with the RegSvr32 program. With all Office
applications closed, go to the Windows Start menu, choose Run, and enter the
following. Of course, change the file name to the complete file name of your
CAI DLL file:
RegSvr32 "C:\YourFolder\ExampleAddIn.dll"
If you use the automated COM Add-In Installer Workbook to install your CAI, you may omit this step. The Installer does this for you.
Registry Keys
You need to add a key with some values to the System Registry in order for
Excel (and/or other host applications) to recognize the add-in. You can use
RegEdit to edit the registry directly, or use the automated
COM Add-In Installer Workbook to
install your CAI. If you want to use RegEdit, you will need to create
a key in the HKEY_CURRENT_USER
section of the Registry named
Software\Microsoft\Office\AppName\AddIns\YourComAddInProgID
where
AppName is the name of the host application
which will use your CAI (e.g, "Excel" or "PowerPoint"), and
YourComAddInProgID
is the ProgID of your COM Add-In. The ProgID is the VB6 Project Name of your
CAI, followed by a period, followed by the name of the class in which you
implemented the IDTExtensibility2 interface for the host application.
For example, the ProgID of the example COM Add-In describe on this page is
ExampleCAIProject.ExampleConnect. Because we used
a single connection class for both Excel and PowerPoint, the ProgID is the
same when adding the registry entries for both Excel and PowerPoint.
Then, within this key, create the following values:
| Name | Type | Description | Value |
| CommandLineSafe | DWORD | Indicates whether the CAI can be run from the command line. | 0 |
| Description | String | A description of your CAI. | Example Description |
| FriendlyName | String | The name that will be displayed in the CAI dialog box. | My Example COM Add-In |
| LoadBehavior | DWORD | Indicates how the CAI will start up. | 3 |
You must now decide whether to create this same key and values in the HKEY_LOCAL_MACHINE section of the Registry. If you include this in the HKEY_LOCAL_MACHINE section of the Registry, the host application will not display this CAI in the COM Add-Ins dialog box, and the CAI cannot be loaded or unloaded by the user (without the use of VBA code). This is done to prevent one user from changing settings used by all users.
However, it will make the CAI available to all users of the computer. If you do not include this key and its values in the HKEY_LOCAL_MACHINE section, the you will have to install the CAI for each user of the machine.
You can download the complete VB6 Project, including the Installer workbook, here.
Debugging Your COM Add-In
Once you've written your CAI, you'll need to be able to debug it to find potential problems as you've added additional functionality beyond the very limited functionality presented in this example CAI. To debug your CAI, open the project in VB6. Place breakpoints (F9) at the appropriate locations, such as in the OnConnection event procedure, or wherever in your code you need to debug. Next, press CTRL+F5 to start your DLL in debug mode with a full compile. Then open the host application. VB6 will automatically redirect the host application's reference from the compiled DLL file to the project you have in debug mode. When code execution encounters one of your breakpoints, execution will pause and you will have all the VB6 debugging tools at your disposal, such as breakpoints, watches, the Immediate Window, and so on. It is assumed you are familiar with debugging code. The procedures and tools for debugging VB6 code are the same as those in VBA. See the Debugging VBA page for more details.
The COM Add-In Dialog
To manage COM Add-Ins, you need to be able to access the COM Add-Ins
dialog box, shown below on the left. In the default Excel menu and
commandbar configuration, there is not item to display this dialog. You
should add the COM Add-Ins menu item to your Tools menu.
Click here for instructions.
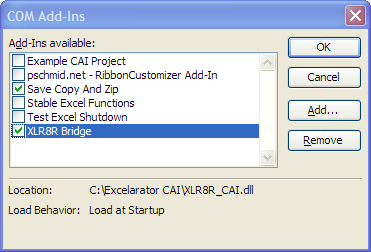
Note that only add-ins configured for the current user are displayed in the dialog (those add-in that have a key in the HKEY_CURRENT_USER section of the registry and do not have an item in the HKEY_LOCAL_MACHINE section of the registry). Add ins that are configured for all users (add-ins with a key in HKEY_LOCAL_MACHINE) are not listed in the dialog. This is done to prevent one user from changing the settings that affect all users of a machine.